Category Archives: Network

Authoritative vs Non-authoritative domains / DNS servers

An authoritative answer comes from a name server that is considered authoritative for the domain which it’s returning a record for (one of the name servers in the list for the domain you did a lookup on).

An authoritative name server is a name server that has the original source files of a domain zone files. The is where the domain administrator has configured the DNS records for a domain. Authoritative DNS server can be master DNS server or its slaves.

Example, Authoritative DNS server,

domain tecadmin.net’s authoritative are alec.ns.cloudflare.com and athena.ns.cloudflare.com. If you directly query to these DNS servers, they will return authoritative answer because they have the original files of domain zone.

$ nslookup tecadmin.net alec.ns.cloudflare.com

Server:         alec.ns.cloudflare.com
Address:        173.245.59.59#53

Name:   tecadmin.net
Address: 104.27.188.217
Name:   tecadmin.net
Address: 104.27.189.217

A non-authoritative answer comes from anywhere else (a name server not in the list for the domain you did a lookup on).

Example, Non-authoritative DNS server, 8.8.8.8 of Google DNS

Non-authoritative name servers do not contain original source files of domain’s zone. They have a cache file for the domains that is constructed from all the DNS lookups done previously. If a DNS server responded for a DNS query which doesn’t have original file is known as a Non-authoritative answer.

$ nslookup tecadmin.net

Server:         8.8.8.8
Address:        8.8.8.8#53

Non-authoritative answer:
Name:   tecadmin.net
Address: 104.27.189.217
Name:   tecadmin.net
Address: 104.27.188.217

What is recursive DNS?

A recursive DNS lookup is where one DNS server communicates with several other DNS servers to hunt down an IP address and return it to the client. This is in contrast to an iterative DNS query, where the client communicates directly with each DNS server involved in the lookup. While this is a very technical definition, a closer look at the DNS system and the difference between recursion and iteration should help clear things up.

The OSI Model & How Information Travels Through The Internet

A user tells their browser to fetch a page from techiess.com The browser makes an HTTPS request to techiess.com. To fetch the required web page it passes the request to its HTTP protocol handler, that is Layer 7 of the OSI model, the Application layer.

When the HTTP protocol handler at Layer 7 recognizes that the request is for a secure document, it passes the request to the TLS library at Layer 5 and 6 of the OSI model. These layers are called the Session and Presentation layers.

In order to open a secure channel, the TLS library needs to establish a connection to the destination. It passes a connection request to TCP which lives at Layer 4 of the OSI model, the Transport layer. The TCP handler receives the connection request. Then, it creates a packet with the “SYN” flag set — the first part of the three-way handshake with the remote server to establish a connection.

After the TCP handler has created a packet to initiate a connection, it passes the packet down to IP which lives at OSI Layer 3, also called the Network Layer. The network layer receives the packet and adds the correct IP information to its header. That informs the internet routers how to route the packet to its destination IP address.

Now that the network layer has a routable packet, it passes it down to Layer 2, the Data-Link layer. The data-link layer adds the router’s MAC address as the local destination address, allowing the router to send the packet out to the Internet.

In order for the packet to get onto the basic networking transmission technologies of the network, it is then passed to OSI Layer 1 or the Physical Layer to complete the task. The physical layer takes the binary packet and physically encodes it onto network cabling — or places it onto the airwaves in the case of a WiFi network — and the packet begins its journey across the local network and out to the wider Internet.

Once the packet reaches the destination server, the whole process reverses and the packet travels back up the layers of the OSI model.

This process happens constantly as your computer communicates with other remote servers on the Internet.

This article is from https://www.wordfence.com/learn/understanding-the-osi-model-video/

==========

OSI Model is 7 layers, Application, Presentation, Session, Transport, Network, Data-Link, Physical. Application layer is for application such as DNS, SMTP, FTP, Telnet, … Presentation layer is for format data, encryption/decryption, Session layer is start/stop session, Transport layer is TCP/UDP, Port Number, Network layer is IP address, Routers, Data-Link layer is MAC Address, switches, Physical layer is cable, Network Interface Cards(NIC), hub.

# How to internet works

For example via HTTPS, we open a page from browser and then browser makes an HTTPS request via HTTP protocol handler. This is application layer, layer 7 of OSI model.

HTTP protocol handler recognizes this request is a secure document. It passes to TLS library at Presentation layer, layer 6 of OSI model and start session at Session layer, layer 5 of OSI model.

TLS libray needs to establish a connection to the destination and it passes a connection request to TCP, Transport layer, layer 4 of OSI model. TCP handler receives and creates packet with “SYN” flag set – it is first part of three-way handshaking.

TCP handler created a packet to initiate a connection, it passes the packet down to IP address, Network Layer. This Network layer routes the packet to destination IP address.

Data-Link Layer, 2nd layer of OSI model, add router’s MAC address as local address, allowing the router to send the packet out to the internet.

And then Physical Layer to complete the task. It takes binary packet and physically encodes it onto network cable or wifi network.

Once the packet reaches the destination server, the whole process reverses and the packet travels back up the layers of the OSI Model.

Linux #16 : Static Route Configuration

Linux에서 Static Route를 설정은 “route”를 통해서 가능하다. 또, 아래와 같이 routing 된 Network의 정보를 확인 할 수 있다.

$ route -n
Kernel IP routing table
Destination Gateway Genmask Flags Metric Ref Use Iface
10.37.114.0 0.0.0.0 255.255.255.0 U 0 0 0 eth0
10.37.0.0 10.37.114.1 255.255.0.0 UG 0 0 0 eth0
10.42.0.0 10.37.114.1 255.255.0.0 UG 0 0 0 eth0
169.254.0.0 0.0.0.0 255.255.0.0 U 0 0 0 eth0
0.0.0.0 10.37.114.1 0.0.0.0 UG 0 0 0 eth0

기본적인 사용방법은

route add -net [IP Addess Segment] netmask [NetMask Information] gw [Gateway Information]

$ route add -net 10.44.0.0 netmask 255.255.0.0 gw 10.37.114.1

$ route -n
Kernel IP routing table
Destination Gateway Genmask Flags Metric Ref Use Iface
10.37.114.0 0.0.0.0 255.255.255.0 U 0 0 0 eth0
10.37.0.0 10.37.114.1 255.255.0.0 UG 0 0 0 eth0
10.42.0.0 10.37.114.1 255.255.0.0 UG 0 0 0 eth0
169.254.0.0 0.0.0.0 255.255.0.0 U 0 0 0 eth0
10.44.0.0 10.37.114.1 255.255.0.0 UG 0 0 0 eth0
0.0.0.0 10.37.114.1 0.0.0.0 UG 0 0 0 eth0

add option을 통해서 10.44.0.0/255.255.0.0가 Gateway 10.37.114.1로 추가 된 것을 확인 할 수 있다.
삭제를 할 경우는 add 대신 del을 사용하면 된다.

route del -net [IP Addess Segment] netmask [NetMask Information] gw [Gateway Information]

$ route del -net 10.44.0.0 netmask 255.255.0.0 gw 10.37.114.1

그런데, 여기서 Server가 부팅이 될 때 자동으로 Static route를 추가한다고 생각해 보자. 그럼, 보통 /etc/rc.local 과 같은 기동시 자동으로 동작하도록 설정을 하거나 하는데, 이럴 경우는 “/etc/init.d/network restart”에 의해 Network가 재기동 될 때는 개별적으로 추가를 해 줘야 한다.
이런 경우 “/etc/sysconfig/static-routes”라는 file을 생성하여 아래와 같이 정보를 입력 해 주시면 Network만 재기동 할 시에도 자동으로 Static Route가 설정 되게 된다. 입력 방법은 아래와 같다.

$ more /etc/sysconfig/static-routes
any net 10.37.0.0/16 gw 10.37.114.1
any net 10.42.0.0/16 gw 10.37.114.1

이 방법이 유용한 것은 Rebooting시에 Static Route을 설정 하고, Online 상태에서 Network 재기동 했을 시 혹시 Static Route를 추가 하는 작업을 잊어 버렸을 때 발생 할 수 있는 문제점을 없애주는 것이다. 인간은 망각의 동물이라.. 필자도 가끔 잊어 버리곤 해서 뒤늦게 문제점을 발견하고 추가를 했던 경우가 간혹 있었다.
또한, 관리하는 서버가 많다보니 매번 똑같은 걸 입력하기 싫어서 아래와 같이 Scripts를 만들었다.

$ more config-static-routes
#!/bin/sh
GATEWAY=`/sbin/ifconfig eth0 | grep "inet addr:" | awk '{print $2};' | awk -F ":" '{print $2};' | awk -F "." '{print $1"."$2"."$3"."1};'`
Printmsg "INFO" "Add route : net 10.37.0.16 gw $GATEWAY"
echo "any net 10.37.0.0/16 gw $GATEWAY" > /etc/sysconfig/static-routes
Printmsg "INFO" "Add route : net 10.42.0.16 gw $GATEWAY"
echo "any net 10.42.0.0/16 gw $GATEWAY" >> /etc/sysconfig/static-routes

간단한거지만, 매번 같은 서버를 구축 할 때 유용하게 사용하고 있다.

Linux #12 : Default Gateway Configuration

Default Gateway 설정은 route command를 통해서 가능합니다.
현재의 설정을 아래와 같이 확인 가능합니다.

$ route
Kernel IP routing table
Destination Gateway Genmask Flags Metric Ref Use Iface
10.37.114.0 * 255.255.255.0 U 0 0 0 eth0
172.16.111.0 10.37.114.1 255.255.255.0 UG 0 0 0 eth0
10.37.0.0 10.37.114.1 255.255.0.0 UG 0 0 0 eth0
10.42.0.0 10.37.114.1 255.255.0.0 UG 0 0 0 eth0
169.254.0.0 * 255.255.0.0 U 0 0 0 eth0
default 10.37.114.1 0.0.0.0 UG 0 0 0 eth0

Default Gateway의 실시간 변경을 위해서는 현재 설정된 Default Gateway를 일단 삭제 할 필요가 있습니다.
따라서 아래와 같이 실행을 해 준 다음 설정을 행하면 됩니다.

$ route delete default
$ route add default gw 10.37.114.1

Redhat 계열의 Linux의 경우 아래 File을 수정함으로서 Reboot시 자동으로 적용되게 할 수 있습니다.

$ vi /etc/sysconfig/network
NETWORKING=yes
NETWORKING_IPV6=no
HOSTNAME=TESTSERVER
GATEWAY=10.37.114.1

설정이 완료 된 Default를 Network Restart를 통해 반영 할 수 있습니다.

$ /etc/init.d/network restart &

&를 추가하여 Background로 동작하게 하면 보다 안전하게 Restart가 가능합니다.

Network #1 : Load Balancing : DSR (Direct Server Return)

1. What is the DSR(Direct Server Return) Load Balancing?

The type of Load Balancing is typically SLB and DSR, the DSR is when client request, which is balanced through L4 switch, is returning, it doens’t pass through L4 switch again that means returning directly.

Using SLB is as below,

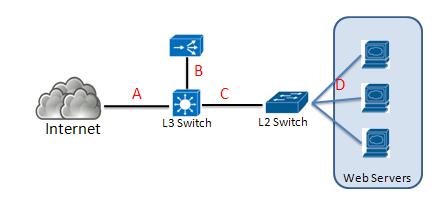
Internet → A → L3 Switch → B  → L4 Switch → C → Web Server → C → L4 Switch →
 B → L3 Switch → A → Internet

The point is the Client Request and Server Response pass through L4 switch.
Using DSR is returning directly from the server as below,

Internet → A → L3 Switch → B → L4 Switch → C → L2 Switch → D → Web Server 1 → D →
 L2 Switch → C → L3 Switch → Internet

2. How to configure the DSR(Direct Server Return) on Linux?

You need to add and configure the Loopback device with L4  for DSR.

/sbin/ifconfig lo:0 xxx.xxx.xxx.xxx netmask 255.255.255.255

# ifconfig
eth0      Link encap:Ethernet  HWaddr 00:50:56:92:5E:B9
          inet addr:10.0.0.151  Bcast:10.0.0.255  Mask:255.255.255.0
          inet6 addr: xxxx::xxxx:xxxx:xxxx:xxxx/64 Scope:Link
          UP BROADCAST RUNNING MULTICAST  MTU:1500  Metric:1
          RX packets:1216814699 errors:0 dropped:0 overruns:0 frame:0
          TX packets:1098502538 errors:0 dropped:0 overruns:0 carrier:0
          collisions:0 txqueuelen:1000
          RX bytes:286063316490 (266.4 GiB)  TX bytes:580239909610 (540.3 GiB)
          Base address:0x2000 Memory:d8920000-d8940000

lo        Link encap:Local Loopback
          inet addr:127.0.0.1  Mask:255.0.0.0
          inet6 addr: ::1/128 Scope:Host
          UP LOOPBACK RUNNING  MTU:16436  Metric:1
          RX packets:420991723 errors:0 dropped:0 overruns:0 frame:0
          TX packets:420991723 errors:0 dropped:0 overruns:0 carrier:0
          collisions:0 txqueuelen:0
          RX bytes:720576542847 (671.0 GiB)  TX bytes:720576542847 (671.0 GiB)

lo:0      Link encap:Local Loopback
          inet addr:xxx.xxx.xxx.xxx  Mask:255.255.255.255
          UP LOOPBACK RUNNING  MTU:16436  Metric:1

If you want to add a device for DSR and work permernatly, create the loopback device “ifcfg-lo:0”
if not then you will be creating one.
Excute the following command:

# cd /etc/sysconfig/network-scripts
# vi ifcfg-lo:0
DEVICE=lo:0
IPADDR=xxx.xxx.xxx.xxx
NETMASK=255.255.255.255
ONBOOT=yes
NAME=loopback

 Additionally it is necessary to disable invalid ARP replies(misbehaving)

“Linux ARP flux” problem. Linux answers ARP requests on wrong and unassociated interfaces per default. This leads to the following two problems:

  • ARP requests for the loopback alias address are answered on the HW interfaces (even if NOARP on lo0:1 is set).
  • If the machine is connected twice to the same switch (e.g. with eth0 and eth1) eth2 may answer ARP requests for the address on eth1 and vice versa in a race condition manner (confusing almost everthing).

This can be prevented by specific arp kernel settings. Take a look here for additional information about the nature of the problem (and other solutions): http://linux-ip.net/html/ether-arp.html#ether-arp-flux.

To fix that generally (and reboot safe) we recommend to include the following lines into /etc/sysctl.conf (2.6 kernel only):

net.ipv4.conf.all.arp_ignore=1
net.ipv4.conf.all.arp_announce=2

The following commands may be used to change the settings interactively during runtime:

# echo 1 > /proc/sys/net/ipv4/conf/all/arp_ignore
# echo 2 > /proc/sys/net/ipv4/conf/all/arp_announce

Unfortunately there seems to be no general and simple solution for for kernel 2.4. We recommend currently upgrading to 2.6 kernel in that case, this is probably the easiest way.